|
The three parts for the body area ready to be glued up! The front and back plates are as ready as I will get the now. I hope they are good enough. I haven't done proper tuning of the tap tones. I tried holding on various places and tap and other places but I've had trouble making much sense of all that. And I am concerned that if I now remove material from either plate, I might remove too much from a wrong place I will now glue it all up and wait until the whole thing is ready before returning to it. If anything I think the top has a higher note so maybe I need to reduce the thickness of the front plate, or of the bass bar. But that can also be done later as the top should come off fairly easily. So I will now finish what I can, and once setting up the cello with a luthier I can get feedback on the general sound of the cello and maybe advice on how to fix it. 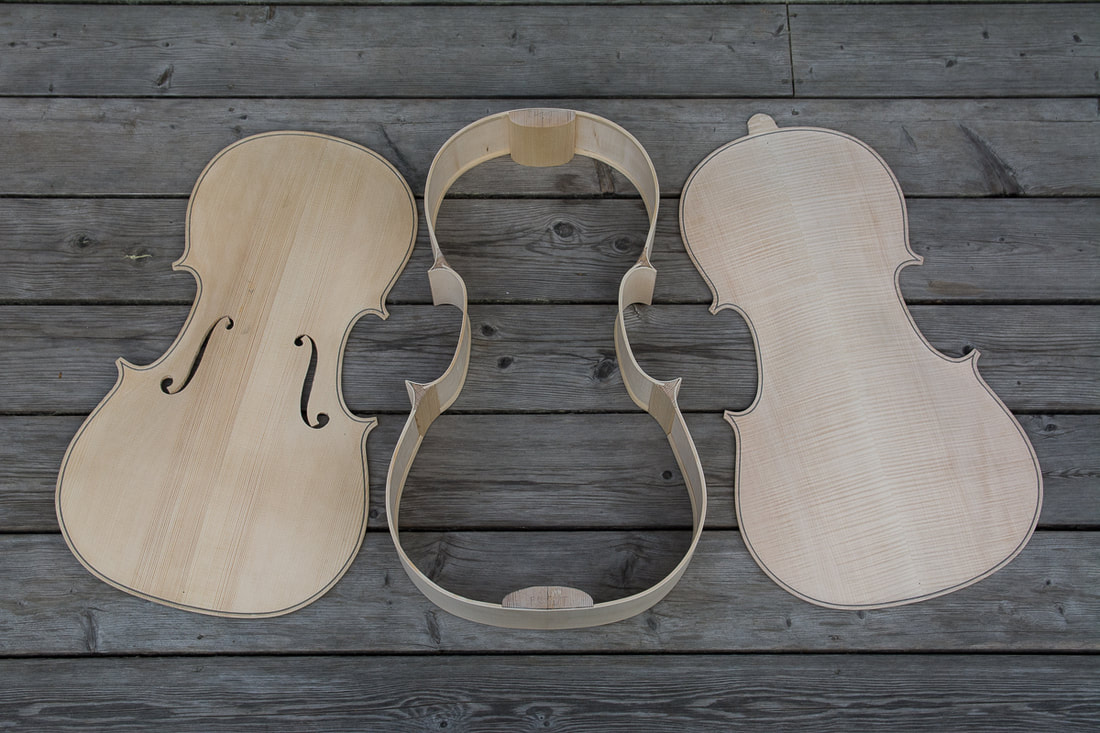
0 Comments
Once the mould was out I could shape the blocks. The corner blocks were shaped using a gouge for which I had ground the bevel on the inside. I used the chisel already to shape the corner blocks after having glued them on the mould. The gouge did most of the rough work. I then finished the blocks using my finger plane. The upper and lower blocks were shaped using a wide chisel and a block plane. Shaping the blocks was nice work. The spruce was easy to work with and I think I got nice curves on all the blocks. Before shaping the lower block I drilled a small hole though the ribs and the block. This is the pilot hole for the endpin hole. It might have been better to drill a bigger whole already now, but since i haven't bought the endpin yet, I wasn't sure how big a hole to drill. After having rounded the edges the next thing to do was to prepare the ribs for the glueing of the plates. First I tried to remove all pencil marks form the outride of the ribs with an eraser and then sanded the ribs lightly with fine sandpaper. Once that was done it was time to get the mould out. It came out pretty nicely in the end. I used a small plastic hammer to tap the blocks gently. Nothing broke! It was time to finish the linings. They need to be thinned out at the lower half. The purpose of the linings is to provide more gluing surface for the back and front plates. The lower part only add weight but add no strength. I did the work with the knives I had made. They were nice and sharp. Strobel writes that the linings should be triangular. I maybe took this too literally and in the first pass was aiming to feather the linings to nothing at the lower end. In the second pass I then smoothed the profile of the linings. I did not remove the mould yet like most do at this stage. I am not sure how long it will still take me before I am ready to glue the plates on the ribs so I want to keep the mould on as long as possible. The linings had a small gap in places. I think I will fill the gaps with some glue before going further. I am a little afraid that the gaps might cause some noise when playing the cello if not filled. I think I might be there with the graduation. The thicknesses are now in the right ball park to where they should be. Getting better is maybe out of my reach for now. I don't want to build a system to measure the Chladni patterns. And anyways I don't really know what I should do to change the patterns. I have also had some trouble measuring the tap tones. Maybe I'll post some of the spectra I have measured. I maybe don't quite know the right position where to hole not where to tap. So I maybe see is mixture of frequencies of all sort of modes. The final step for the front would be to add the bass bar. Then I think I would be ready to glue it up. I now think that I will be put it all together and once I am sort of ready I maybe try to find a luthier with whom I could set up the cello. If I then need to open up the body and adjust the plate thicknesses then maybe it is not too bad. |


