|
I visited www.howviolins.fi today. I had contacted the keeper of the shop a little while back to see if I could buy some wood for the next cello as I had forgotten to order the blocks and the linings when I bought the rest of the wood for Cello #2. I also asked if he would have a moment to give some feedback on this first cello I built so that I could learn from my mistakes and improve on the next one.
It was a pleasure to meet Guy and spend a little time with him in his shop. He gave me honest and critical feedback on the cello. He had quite a lot to say. The neck is too large/thick and doesn't quite have the right shape, the ff-holes could be larger, the arching is not consistent, the fingerboard is curved the wrong way, the sound post is all wonky... But it was not all gloom and doom. I had done many things fairly well, and he commented that is a good effort for my first instrument. That was of course nice to hear. He had 4 concrete things which could still be improved on this cello to get the most out of it. The sound post should be set properly, the bridge could be improved (though he did say that it was actually pretty good already) and the curvature of the fingerboard should be fixed and the neck needed working. I think I will attempt some of these myself. I will try to do the fingerboard. I knew already that it should be a little hollow. It had made it straight, and at the time I was too afraid to mess it up so I left it straight. It has now apparently curved the wrong way. This can cause a buzzing sound when the strings do not have enough clearance from the fingerboard. I think I will also work on the sound post. Other than being crooked it was also too tight. It will be a good exercise to try to properly fit the sound post. I maybe lost my patience last time. It is not all that easy to put the sound post in and out and know what to do with it to get a good fit. I probably gave up a too early. My plan is now to do those 2 things and then take it back to Guy and let him finish it off. I want to give it a try myself as I want to learn this stuff, but I also want to get the best sound out of the cello.
0 Comments
I painted the edges of the ff holes and the pegbox black. I think it looks really nice and gives a finished look to the instrument. While reading about this learned that doing this isn't as standard as I had thought. Some say that painting them black like this makes the instrument look cheap. One of these days I would like to have a really good look at some instruments by good luthiers. I haven't seen all that many cellos until now. I have now mostly used my sons current cello as an example but for the next one I would like to have a nicer cello to take inspiration from. I finished the ff-holes today. I tried with a file at first thinking it would be easier to deal with the differences hard and soft grains of the wood. But that wasn't so. I found it difficult to control the file and ended up always taking more of the oft wood out than I wanted. So used the knives I had made earlier. They worked great. I used all knives in the end. The very thin blade was great at the tight spots where as the wider ones allowed me to get nice smooth shavings elsewhere. It was good to have a left handed blade also. The ff-holes aren't in fact quite finished, I didn't do the nicks yet. Today I cut out the second ff-hole. Nothing too special there. In one spot I sawed to the line. I hope it didn't go much too far. Both ff-holes are now roughly sawn out. I stayed pretty close to the line when sawing so that I don't have all that much to clean up with the knife. The next thing on the front plate is to bring it to final thickness and so finish the graduation. After the graduation is done I will then finalise the ff-holes. The front is starting to look like a cello top! I also made a small knife for refining the ff-holes. I took the measurements for #VK025R from www.hocktools.com/products/knives.html. I made the blade from a piece of O2 steel which I bought with my last order from Dictum. I got the idea for making my own knives from Uri Tuchman, for example Making a Tree Shaped Kiridashi. Look also for other videos by Uri, he has some great projects. 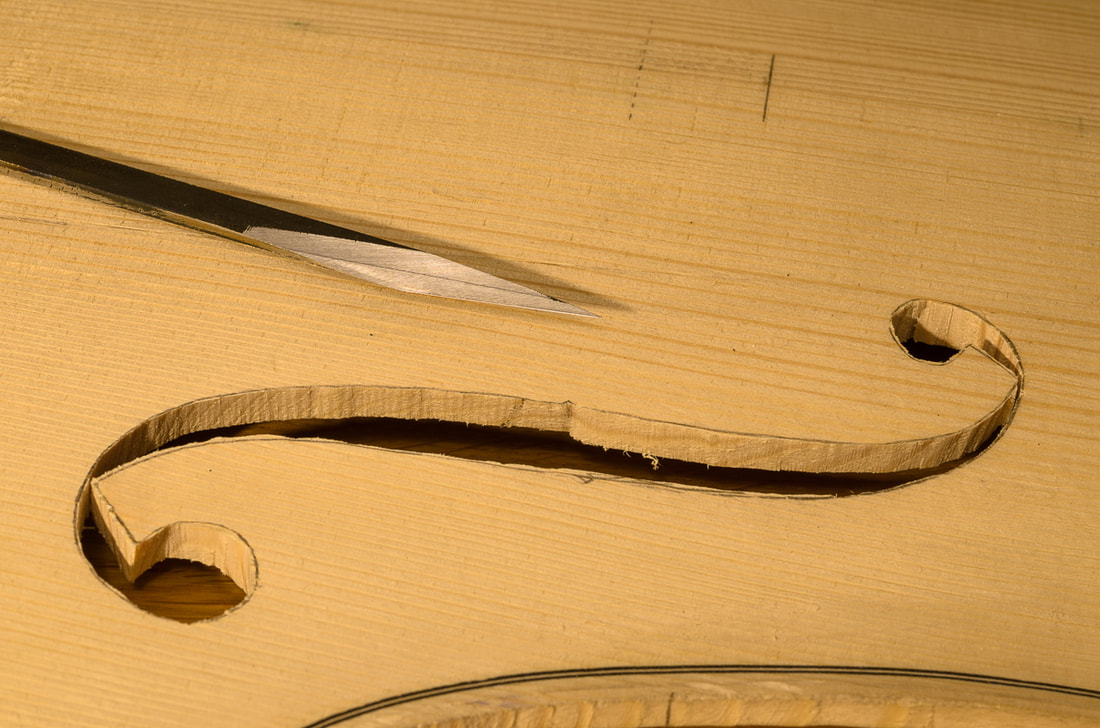 The next step now that the front has been hollowed out is to start working on the ff-holes. First I needed to add the fluting of the lower wings. The instructions are mostly quite short on this and the cello my son currently has doesn't have fluted ff-holes so I wasn't too sure what I was aiming for. I added some but not all that much. Maybe I should done a stronger fluting. The good thing is that the fluting is purely decorative and shouldn't affect the sound. After having added the fluting to both sides it was time to cut out the first ff-hole. I first drilled two holes so that I could insert the saw blade. And then sawed the ff-hole open. The corners around the ends are very delicate so one needs to be careful when cutting out the holes. One should always go with the grain, and first cut the corner open while it is still well supported. I didn't have time to cut both ff-holes today. And maybe anyways I'll finish the first one first so that I can learn from my mistakes on the first one before doing the second. Some good references:
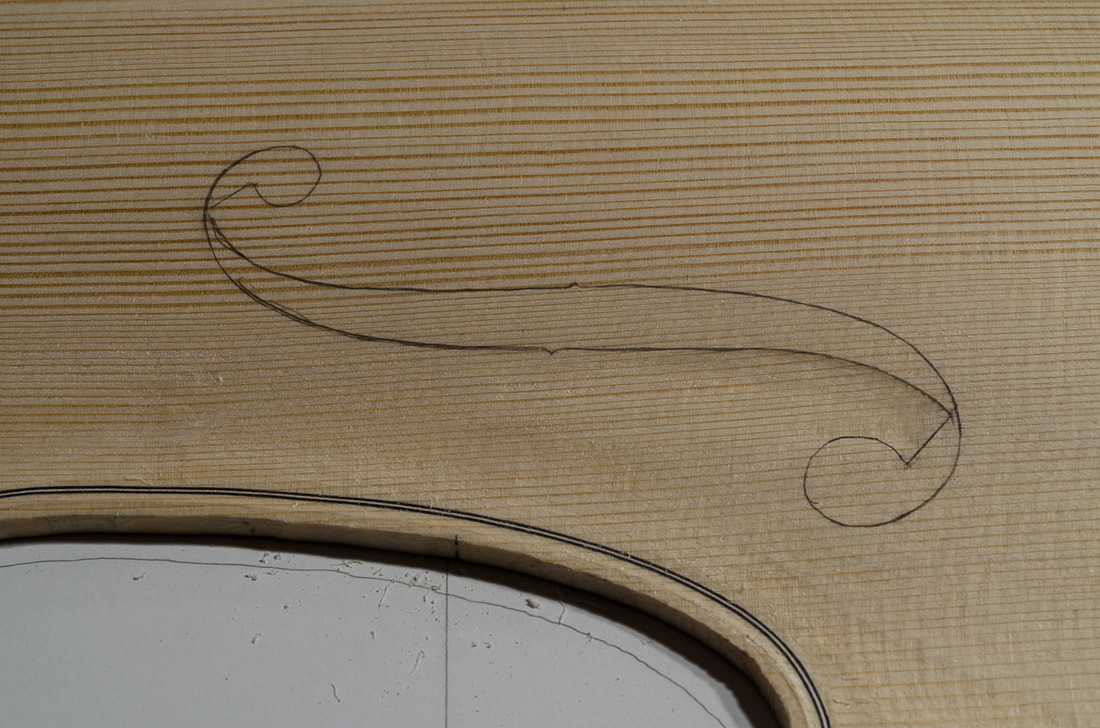
After checking my books, I decided to draw the f-holes next. I think I will still reduce the thickness of the front plate a little before actually cutting the f-holes but I thought it wouldn't hurt to mark them already now. I have been a worried if my assumption that I can just downscale a 4/4 cello uniformly by 86.8 % will work, but this time I actually got a nice validation of the approach. Barker's table for approximate measurements for a cello list for 1/2 cello:
To mark the f-holes I glued the scaled f-hole from the plans to a piece of plastic sheet and cut it out. I then traced the hole on both sides symmetrically. When cutting out the f-holes the lines will need to be cut out too. |